Exposure Control and the Epson PhotoPC 600
 visitors since May 28, 1998
The Epson PhotoPC 600 does not provide any manual control over image exposure. Unfortunately, this can sometimes lead to pictures that are not (to my eyes) properly exposed. This can be a problem in outdoors shots where the sky is a large part of the subject area. These shots often come out underexposed as the camera tends to correctly expose bright parts of the picture (e.g. the sky), but underexpose darker areas (e.g. ground, trees, people, buildings, etc.) Figures 1 and 3 below illustrate the problem.
There are at least two solutions to this problem. A simple solution is described below and a more accurate method is described here.
Here is the simple solution:
1. Choose the scene you want to photograph.
2. Now move the camera and point it at a dark spot in this scene (e.g. Point "X" in Figures 1 & 3 below).
3. Push the shutter half way. This will cause the camera to select a shutter speed and aperture that will produce a lighter exposure.*
4. Move the camera back to the image you want to photograph and push the shutter all the way down. The camera should now take a brighter picture (Figures 2 & 4).
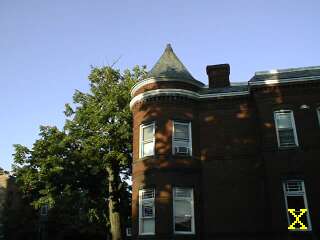
Figure 1
Building, underexposed |
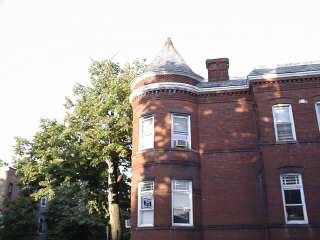
Figure 2
Building, lighter exposure |
|
|
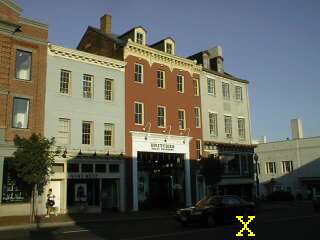
Figure 3
Store Fronts, underexposed |
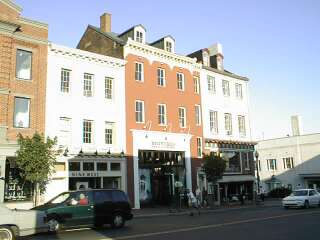
Figure 4
Store Fronts, lighter exposure |
* I think that the Epson employs a "center-weighted" light-metering system. This means that when determining the appropriate exposure for the scene, the camera looks at the overall brightness in the image, but pays particular attention to the center of the image.
Here is some more information on light-metering and exposure control:
- An article that describes the 3 main light-metering systems used in cameras
- A shorter piece on the most common light metering systems used in cameras
- An essay on finetuning exposure
Home